Working with Google Drive API using JavaScript
Table of Contents
- Introduction
- Enter Google Cloud Platform
- Access to Google Drive API
Introduction
In today’s fast-paced digital world, the ability to store and manage our files online has become a cornerstone of efficiency, especially for developers and content creators. Enter Google Drive , a household name that not only offers decent amount of storage space for free but also comes equipped with a user-friendly graphical interface, making it a breeze to navigate through files and folders. But what if I told you that the real magic happens when you go beyond clicking and dragging within its graphical user interface?
For those of us looking to automate tasks, integrate with other apps, or simply manage files in a more dynamic way, Google Drive’s API becomes our gateway to creativity and productivity. While the GUI serves us well for day-to-day management, the API opens up a realm of possibilities, allowing for custom solutions that can save time and enhance workflows.
However, before visions of automated file management start dancing in your head, there is a small catch - getting started with the Google Drive API is not as straightforward as using the GUI. Setting it up requires a bit more than basic programming knowledge and a willingness to tinker with codes and credentials. But do not let this deter you. I am here to guide you through the process, making it as painless as possible and, who knows, maybe even a bit fun.
So, whether you are a seasoned developer or a curious beginner eager to extend the functionality of your Google Drive, you are in the right place. Let’s embark on this journey together and unlock the full potential of storing and managing files in the cloud, the developer’s way.
Enter Google Cloud Platform
Jumping into coding with Google Drive is not as simple as using a single API key; it introduces us to the Google Cloud Platform (GCP). Think of GCP as the big dashboard where everything Google-related is set up. Here, instead of one key, you manage projects and access controls, a bit different from the usual way of working with API’s.
GCP might seem overwhelming at first, with more steps than just drag-and-drop. But this extra setup is your ticket to unlocking Google Drive’s full potential through coding. So, let’s roll up our sleeves and get ready to explore what GCP offers, making our journey into programming with Google Drive exciting and full of possibilities.
1. Create GCP Console account
To start using Google services API, you need to first get into the GCP Console . Good news: your existing Google account, like the one for Gmail, works here too.
- Go to the GCP Console site.
- Sign in with your Google account.
- Follow the steps to activate your GCP Console account.
2. Create GCP project
The next essential step is creating a GCP project. Think of a GCP project as your personal workspace or playground where all the magic happens. It is here that you create, manage, and run everything you want to do with Google Cloud services, including working with the Google Drive API.
Projects are crucial because they form the foundation for using all Google Cloud services. They help organize your work, manage permissions, and keep track of your usage and billing for different services. Essentially, without a project, you cannot really do much in GCP.
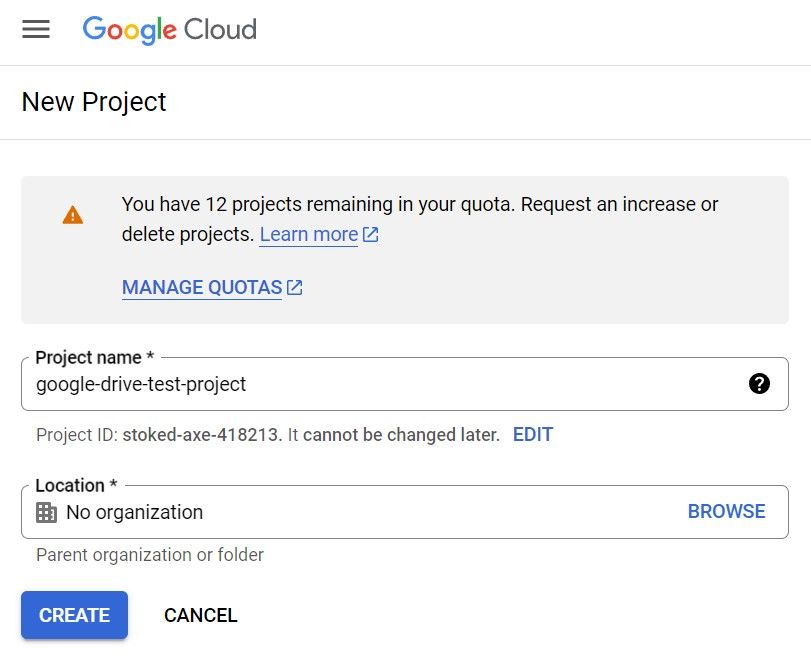
- Go to project creation form . Alternatively, you can reach it from the GCP GUI in the “Projects” dropdown near the top of the screen by selecting “New Project”
- Give your project a name. You can leave the organization field empty.
- Hit “Create” and you are all set!
3. Enable Google Drive service
With your GCP Console account set up, the next crucial step is to activate the Google Drive API within your project. In the Google Cloud Platform, each project acts as a separate entity for managing and using Google services.
- Select the project you just created.
- Navigate to “APIs & Services” and then to “Library”
- Search for “Google Drive API”
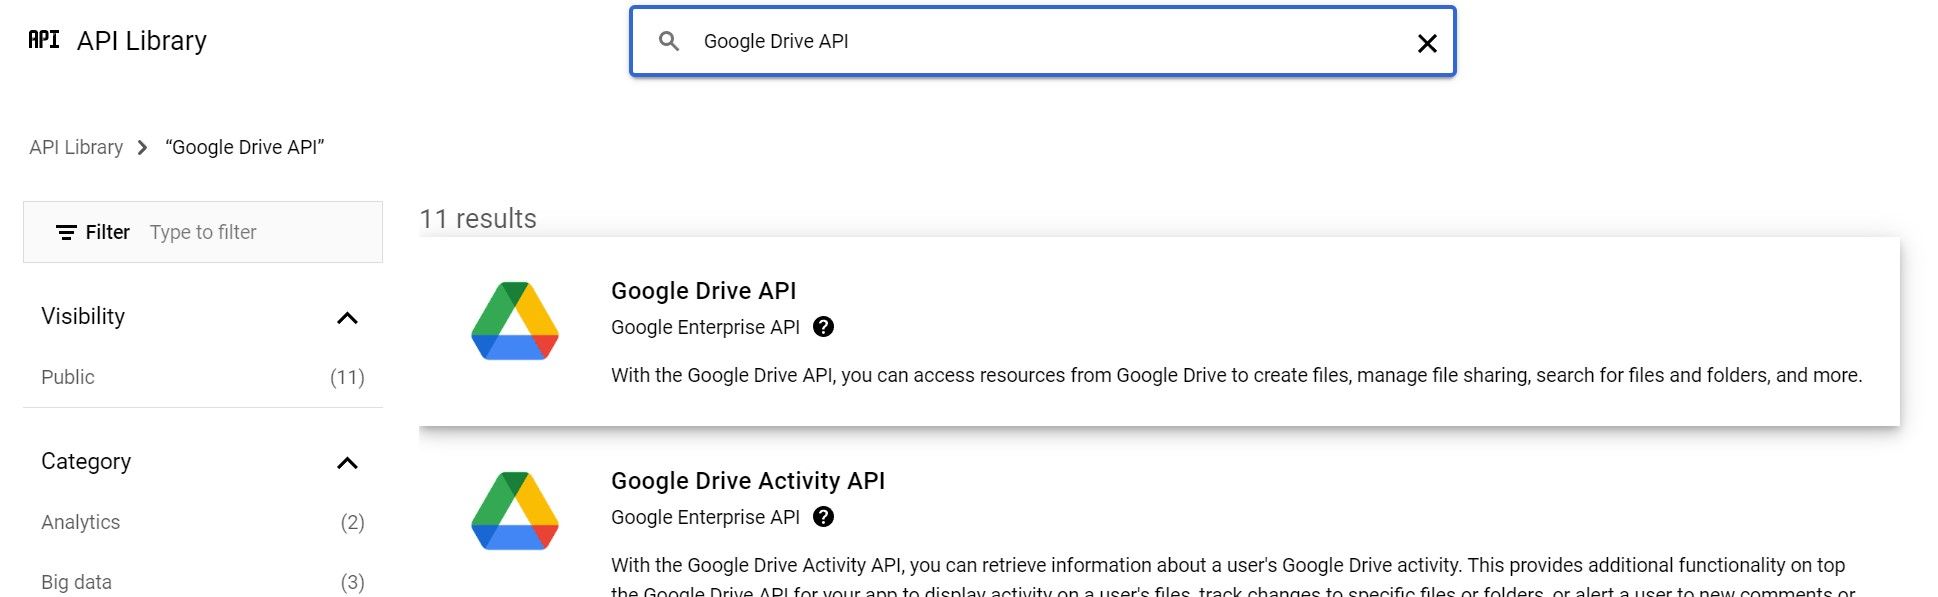
- Select “Google Drive API”
- Press “Enable” button
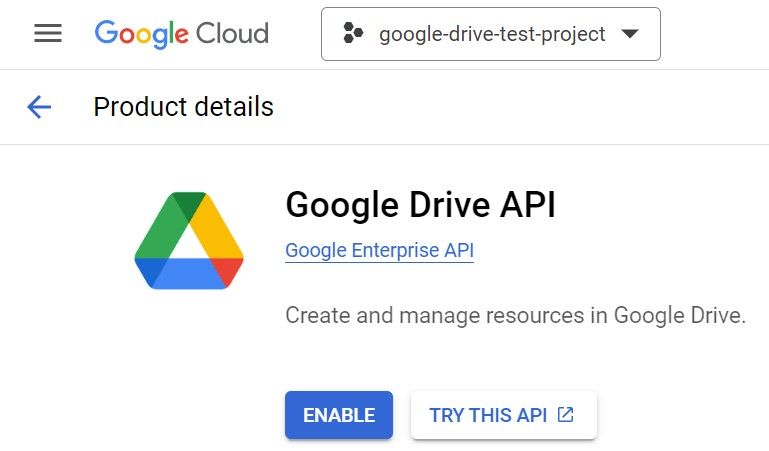
With it active, you are almost set to start diving into the coding part, where you will bring your ideas to life by interacting with Google Drive through your scripts and applications. There is just one thing left, namely Authorization.
Access to Google Drive API
The next vital step in our journey to manipulate Google Drive files programmatically is figuring out how to connect to it securely. This is where authorization comes into play. Authorization is essentially the process of obtaining permission to do things within Google Drive on behalf of yourself or someone else. It is crucial because it ensures that only authorized users and applications can access and manipulate files, safeguarding privacy and security.
In the world of Google services, you have got two main paths for getting authorization: OAuth 2.0 credentials and service account credentials. Think of them as your all-access passes to Google Drive, each designed for a specific type of access.
OAuth 2.0 credentials
If you are planning to use Google services programmatically for personal projects, Service Account credentials are a simpler and more practical choice than OAuth 2.0. OAuth 2.0 is tailored for applications needing user consent to access data, which involves managing refresh tokens. For test projects on GCP, these tokens only last 7 days. This means you either have to publish publish your application, requiring extra steps or request a new refresh token every week.
This method is about getting permission directly from a Google Drive user to access their account. It’s ideal for applications that need to interact with Google Drive on behalf of a person. Think of it as asking for the keys to someone’s house to water their plants while they’re away; OAuth 2.0 is the process of asking for and getting those keys.
Understanding OAuth 2.0 Authorization flow
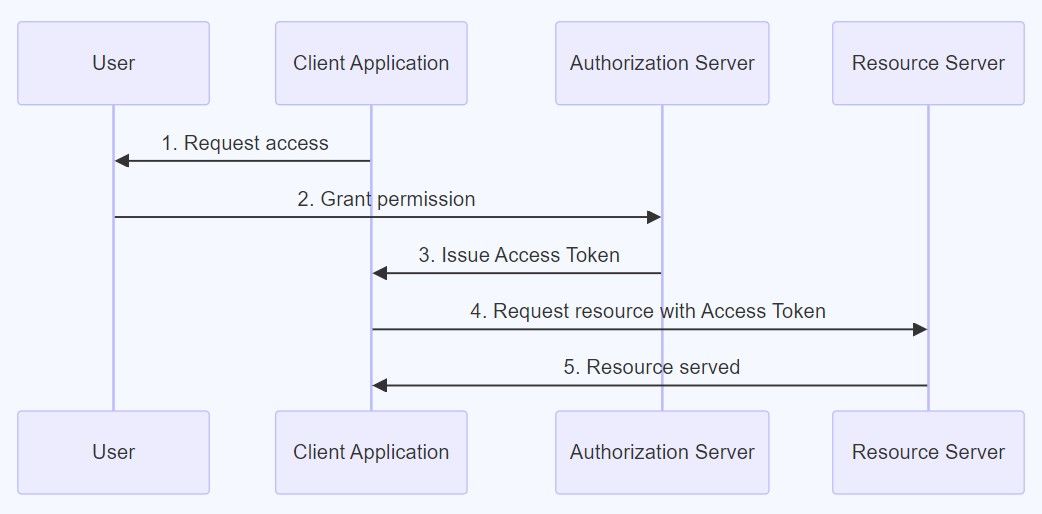
OAuth 2.0 is a standard protocol for authorization that allows applications to secure designated access to user accounts on an HTTP service, like Google Drive. It works by allowing the token-based authentication and authorization. Simply put, OAuth 2.0 lets users approve one application interacting with another on their behalf without giving away their password.
- The client application requests access to the user’s account.
- The user grants the client application permission to access their account.
- The authorization server issues an access token to the application.
- The application uses the access token to request a resource from the resource server.
- The resource server serves the requested resource to the application.
OAuth 2.0 credentials in the GCP ecosystem
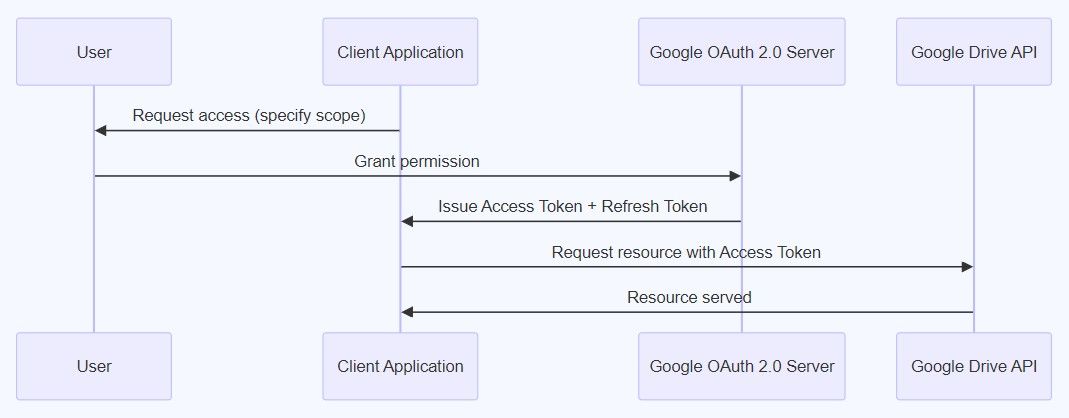
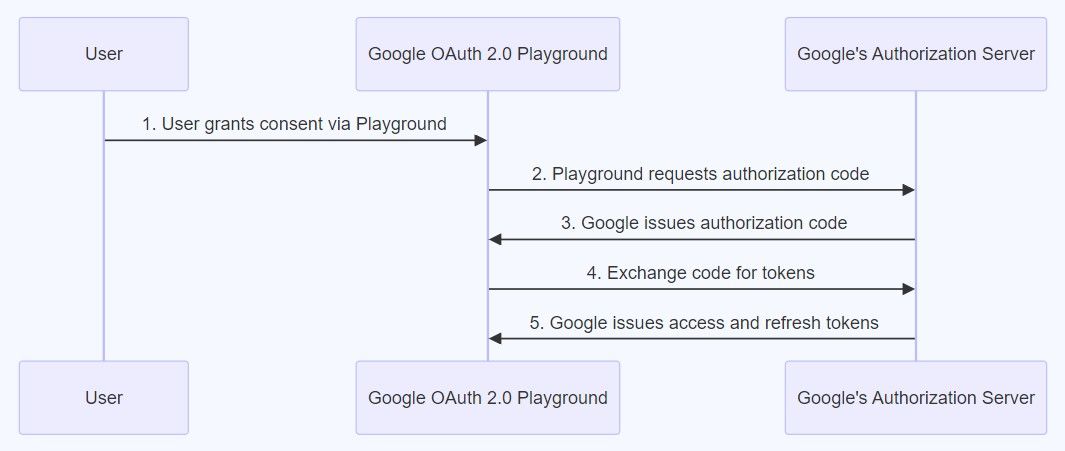
Simplified Google OAuth 2.0 authorization flow with Google Drive API
Within the Google ecosystem, OAuth 2.0 credentials are essential for applications that need to access Google services on behalf of the user (you). Here, the “Authorization Server” is Google’s authorization system, and the “Resource Server” would be Google Drive.
- The client application (your app) initiates the process by redirecting the user to Google’s OAuth 2.0 server. This request includes the scope of the access the app is seeking (such as read or write access to Google Drive files) and a redirection URI to return the user to after authorization.
- The user is presented with a consent screen, detailing the access being requested by the application. By accepting, the user grants the client application permission to operate on their account within the specified scopes. This action effectively gives the app the right to access their Google Drive, under the conditions outlined.
- Upon user consent, Google’s OAuth 2.0 server responds by redirecting the user back to the application with an authorization code. The application then exchanges this code for an access token and a refresh token. The access token grants temporary access, while the refresh token can be used to obtain new access tokens for long-term access.
- Armed with the access token, the application can now make requests to Google Drive’s API on behalf of the user. The token is included in these requests to authenticate and authorize the application’s actions.
- Google Drive’s API processes the application’s requests, and if the access token is valid and the requested action is within the granted scopes, the requested data or service is provided to the application.
Set up GCP project OAuth 2.0 access
To integrate Google Drive into your application with OAuth 2.0, you will first need to obtain the necessary credentials from GCP.
- Select the project you just created.
- Navigate to “APIs & Services” and then to “Configure Consent Screen”.
- Select “External” user type and click on the “Create” button.
- Fill in all the required fields.
- Add
/auth/drivescope (it should be available after enabling Google Drive API) and then click on the “Update” button.

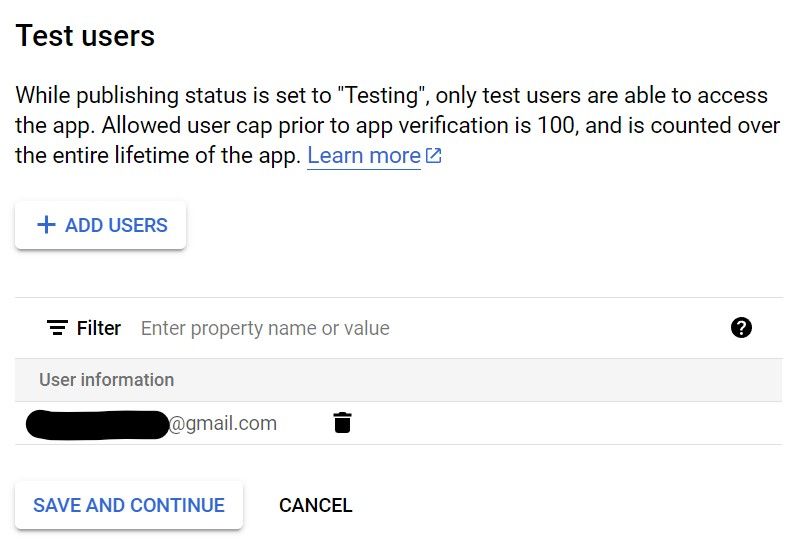
- Add yourself as a test user.
- Complete the creation wizard form.
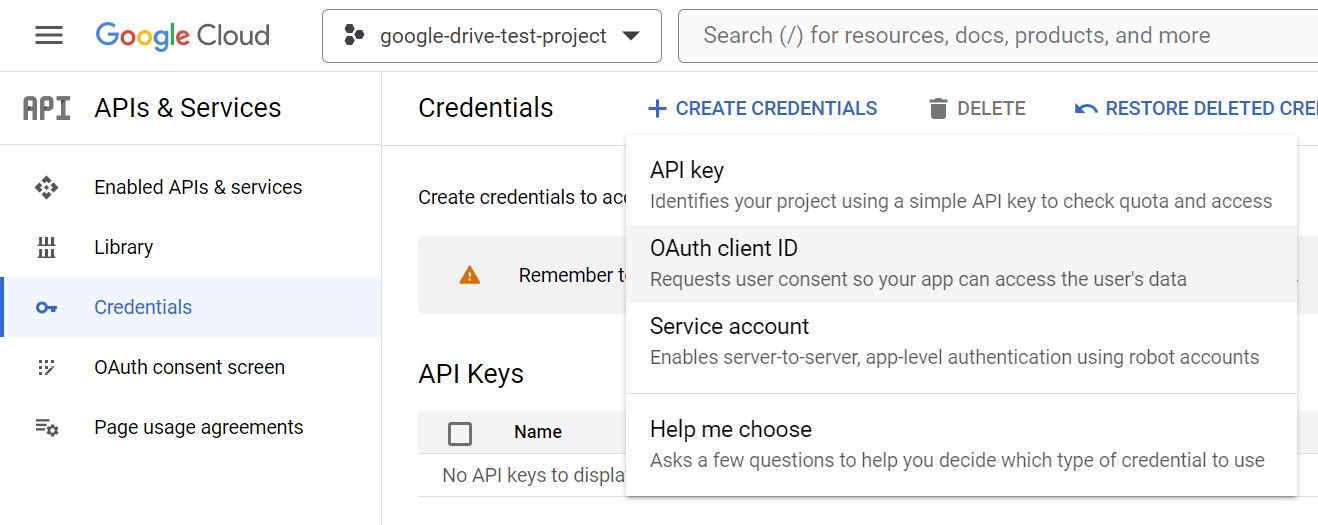
- Navigate to “APIs & Services” and then to “Credentials”.
- Click on the “Create credentials” button and select “OAuth client ID” from the dropdown menu.
- Select “Web application” in the application type dropdown.
- Add
https://developers.google.com/oauthplaygroundin the “Authorized redirect URIs” section. This will be needed later to acquire access tokens. - Click on the “Submit” button.
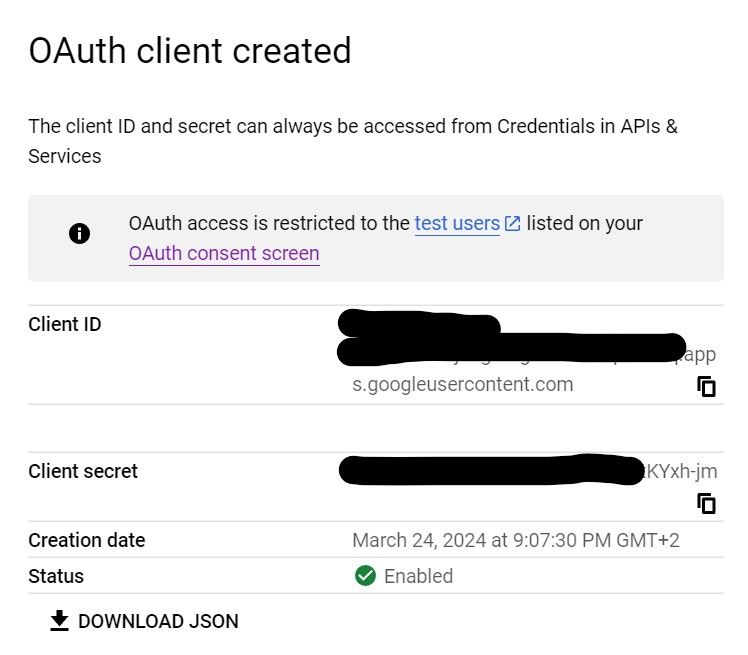
- Save your OAuth client details.
We are nearly there, truly! All that remains is to get the access token, and for that, the Google OAuth 2.0 Playground steps into the spotlight.
Acquire the Access Token
With the OAuth 2.0 credentials in hand, the next exciting step is to acquire the access token that your application will use to interact with Google Drive on behalf of a user (you). This might sound complex, but doing this manually with the OAuth 2.0 PLayground is surprisingly straightforward. Do you remember setting https://developers.google.com/oauthplayground as one of the authorized redirect URI when configuring OAuth 2.0 access in GPC? At that step we told Google’s authorization server that it is okay to send the authorization response (including authorization codes and tokens) to the OAuth 2.0 Playground.
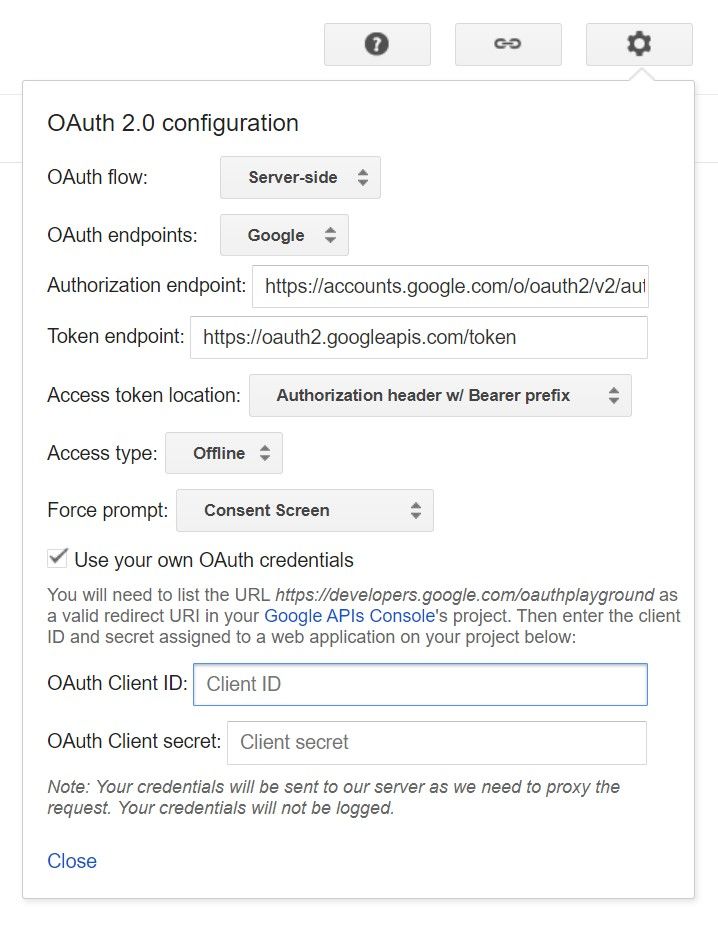
The process of acquiring the access token via OAuth 2.0 Playground
- Go to Google’s OAuth 2.0 Playground site.
- Configure your client credentials in the playground’s settings.
- Authorize the
/auth/drivescope under the “Drive API v3” selection.
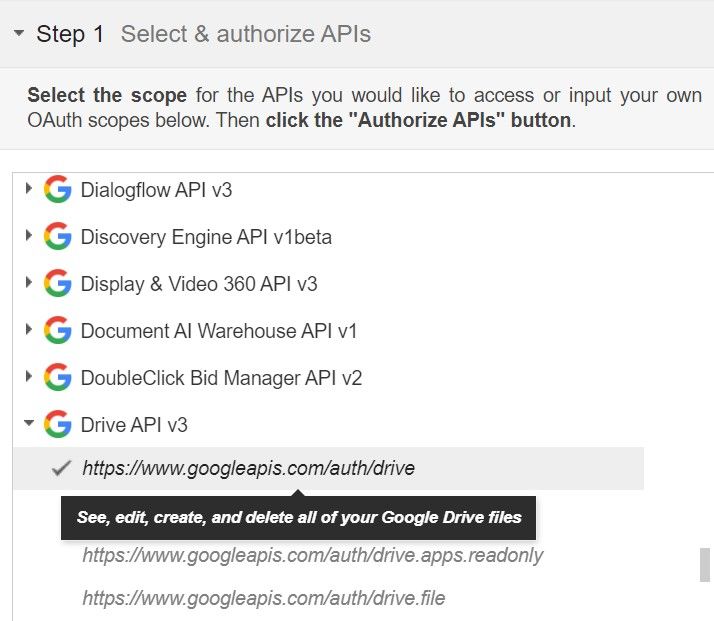
OAuth 2.0 API selection for Drive API v3 scopes for full Google Drive file access
- Click on the “Authorize APIs” button.
- Select your Google account (the one you added as the test user under the project)
- Grant permissions and complete the OAuth consent flow.
- Click on the “Exchange authorization code for tokens”.
- Save the refresh token.
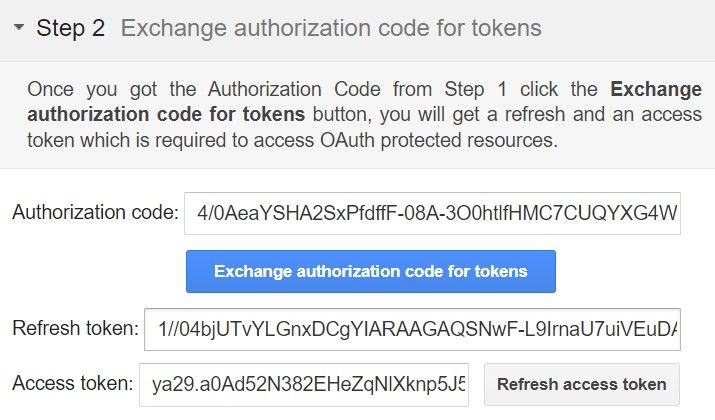
OAuth 2.0 token exchange with access and refresh tokens
Acquiring a refresh token means you have secured a way to maintain access to a user’s data without having to ask for their permission again. Refresh tokens are crucial for long-term interactions with an API, allowing your application to request new access tokens even after the original token has expired.
At this point we have reached a pivotal moment where we can test the integration to ensure all the previous steps have been correctly executed. The access token is your ticket to interact with Google Drive programmatically, allowing you to perform operations such as reading, writing, and modifying files. We can test this directly in Google OAuth 2.0 Playground.
- Open the “Configure request to API” section in Google OAuth 2.0 Playground.
- Click on the “List possible operations” button.
- Select the “List Files” option.
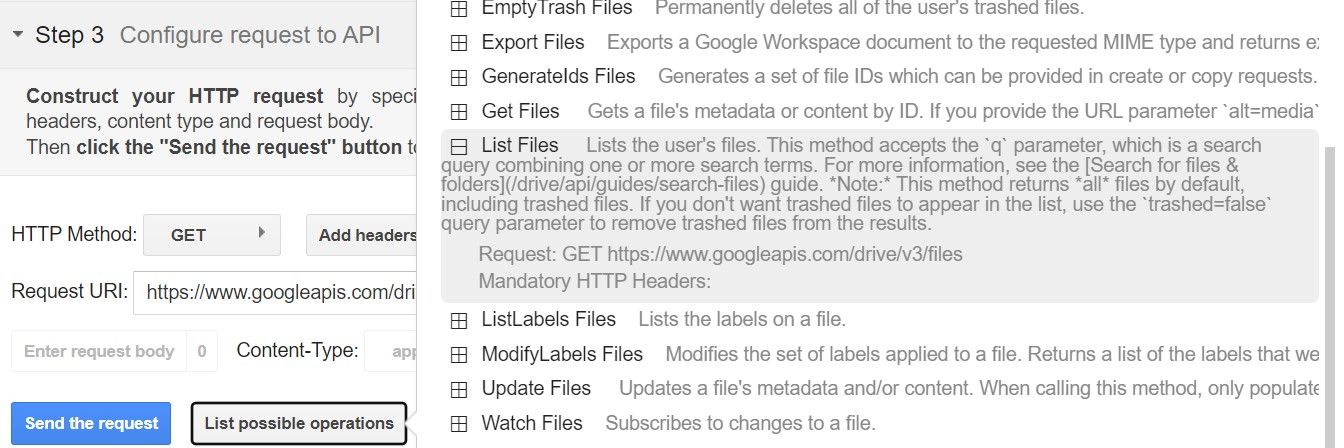
- Click on the “Send the request” button.
This should list the files in the authorized user’s drive. Assuming your drive is empty, Google Drive API response should similar to this:
{
"incompleteSearch": false,
"files": [],
"kind": "drive#fileList"
}TODO: skip to last section when working with google drive api in javascript.
Service Account credentials
Gogle service accounts is an alternative method when it comes to accessing Google services programmatically. Unlike the OAuth 2.0 flow, which is designed for applications requiring access to user data with the user’s consent, service accounts provide a different pathway.
A service account is a special type of Google account intended to represent a non-human user that needs to authenticate and be authorized to access data in Google APIs. It’s associated with your project on the Google Cloud Platform, and it’s ideal for scenarios where your application needs to interact with Google services under its own identity, rather than on behalf of a specific user.
Set up GCP project service account
First, we have to create a service account.
- Select the project you just created.
- Navigate to “IAM & Admin” and then to “Service Accounts”.
- Click on the “Create Service Account” button.
- Fill in service account ID
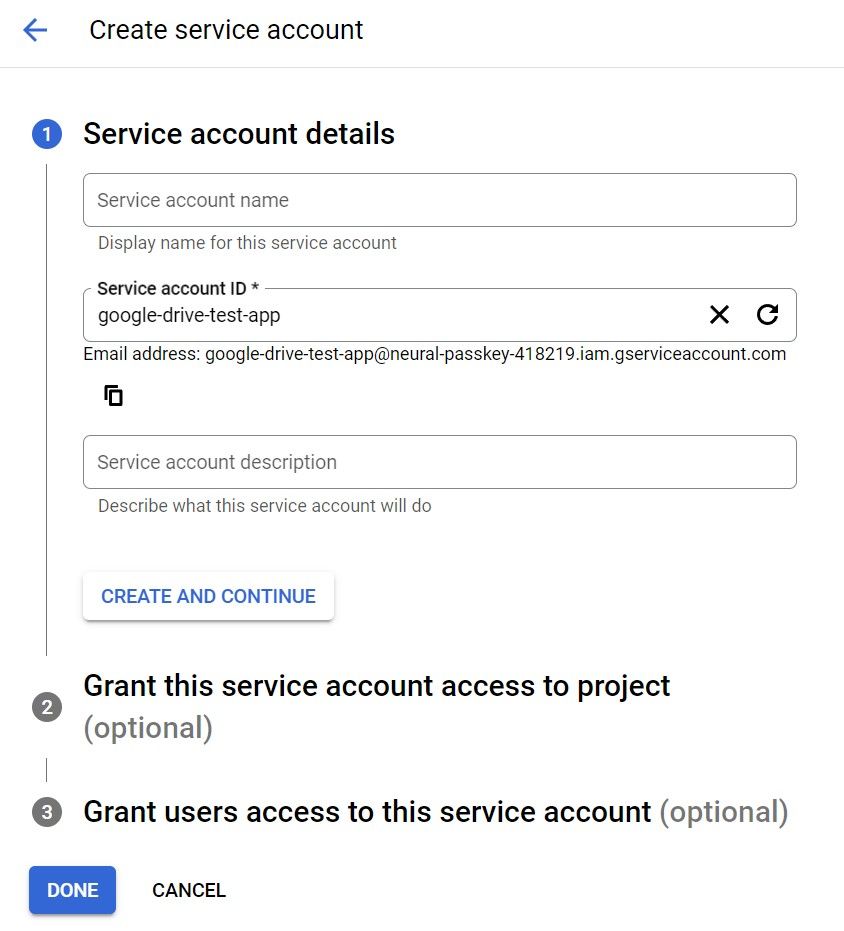
- Click on the “Create and continue” button.
- Select the “Admin actions” option the role dropdown menu.
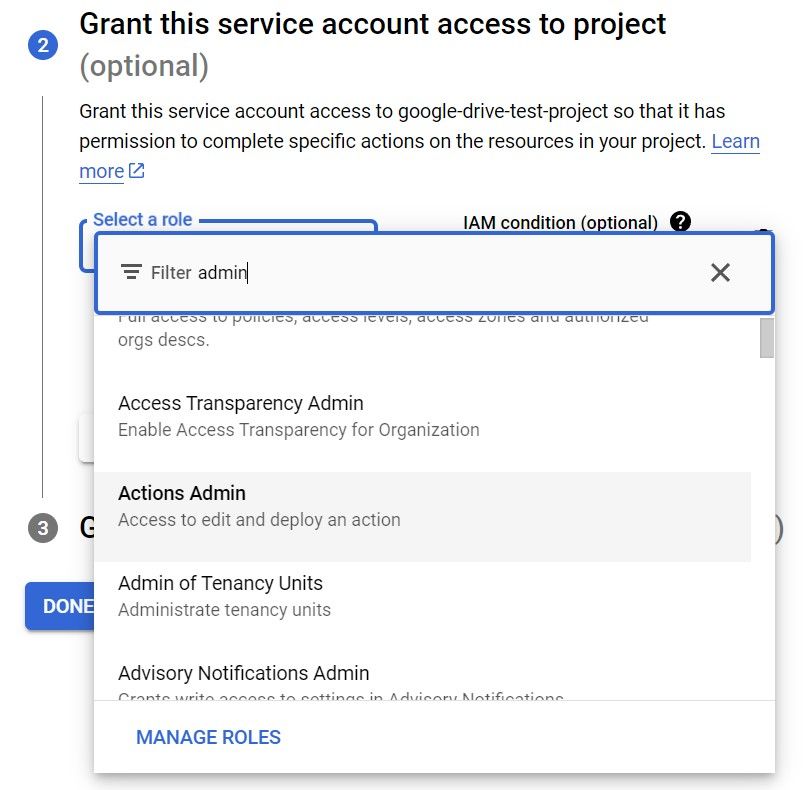
- Click on the “Continue” button.
- Click on the “Done” button.
Acquire Service Account credentials
With the service account in place, generating credentials is your next move. These credentials act somewhat like the access token in OAuth 2.0, enabling programmatic interactions with Google API’s.
- Select the service account you just created.
- Select the “Keys” tab.
- Click on the Add key” button and select the “Create new key” options in the dropdown menu.
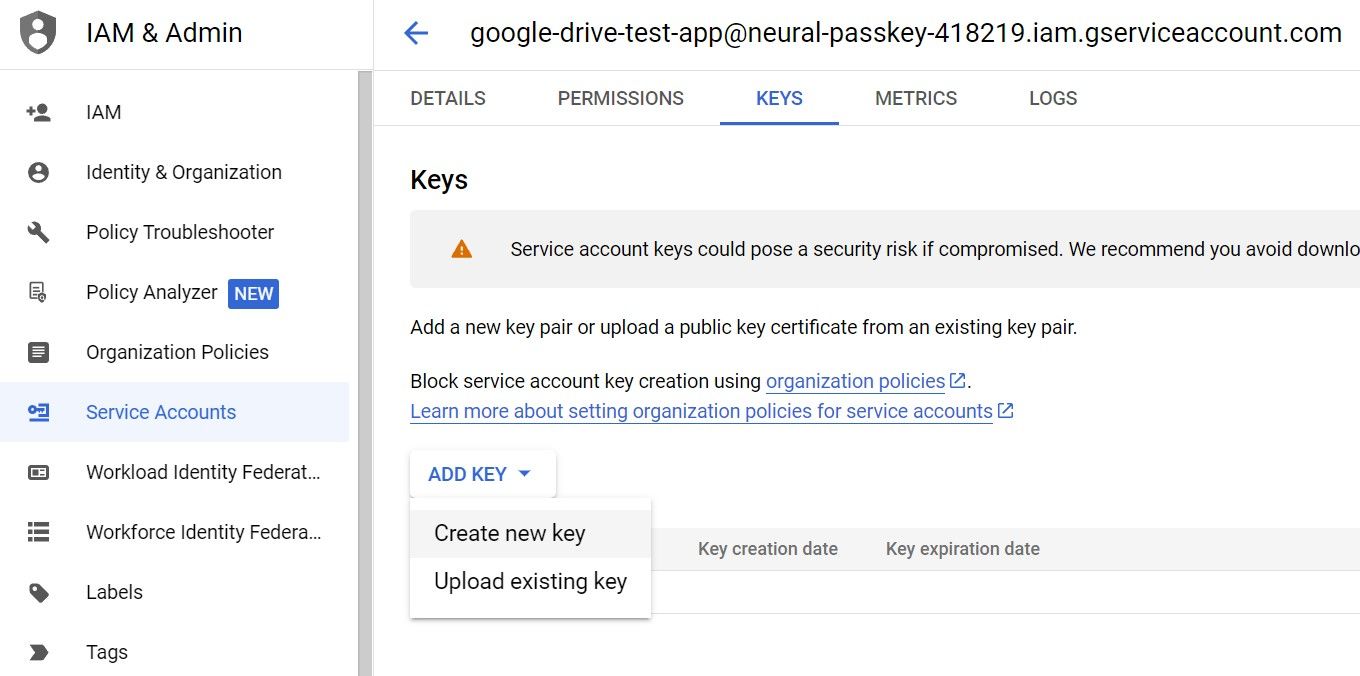
- Choose the
JSONkey type.
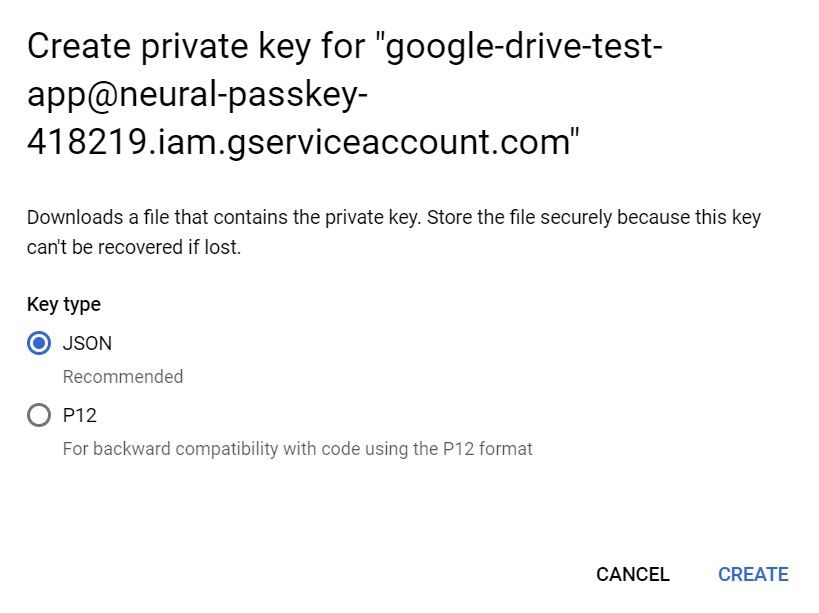
- Click on the “Create” button.
This should trigger automatic download of the file containing your service account’s credentials that looks something like this:
{
"type": "service_account",
"project_id": "...",
"private_key_id": "...",
"private_key": "...", // <==
"client_email": "...", // <==
"client_id": "...",
"auth_uri": "...",
"token_uri": "...",
"auth_provider_x509_cert_url": "...",
"client_x509_cert_url": "...",
"universe_domain": "..."
}We are mainly interested in two entries, namely the client_email and private_key fields. Make sure to save their values as we will need them to authorize to Google Drive API.
When using a service account for Google Drive, remember that data stored in the service account’s Drive isn’t accessible through the standard Google Drive web interface. To work around this and ensure you have GUI access when needed, consider creating a folder in your personal Google Drive and then sharing it with your service account.
Create Google API client in JavaScript
After navigating through the necessary setup within the Google Cloud Platform and understanding the different authentication methods, we have finally arrived at the exciting part - coding! This section of our journey will focus on how to bring all our preparation to life by integrating Google Drive functionality into your JavaScript or TypeScript projects.
We will use the googleapis library to set up Google API clients for both OAuth 2.0 and Service Account methods. Whether you are developing an interactive web application or automating backend processes, the code snippets provided here will be your bridge to accessing Google Drive programmatically.
Make sure you have googleapis dependency installed in your project.
npm install googleapisgoogleapis OAuth 2.0 authorization
To access Google Drive on behalf of a user, your application must be authenticated using OAuth 2.0 credentials. This process involves creating an OAuth 2.0 client with your application’s client ID, client secret, and redirect URI, which is obtained from the Google Cloud Platform Console.
const { google } = require("googleapis");
// Create OAuth 2.0 client.
const authClient = new google.auth.OAuth2(
process.env.OAUTH_CLIENT_ID, // Your GCP OAuth 2.0 application client ID.
process.env.OAUTH_CLIENT_SECRET, // Your GCP OAuth 2.0 application client secret.
process.env.OAUTH_REDIRECT_URI // https://developers.google.com/oauthplayground
);
// Set client refresh token (not the access token).
client.setCredentials({
refresh_token: process.env.OAUTH_REFRESH_TOKEN,
});googleapis Service Account authorization
For applications where user data access is not required, a service account can be used for authorization. This method utilizes the client_email and private_key from your service account JSON credentials.
const { google } = require("googleapis");
const authClient = new google.auth.GoogleAuth({
credentials: {
// This is `client_email` from your service account JSON credentials.
client_email: process.env.SERVICE_ACCOUNT_EMAIL,
// This is `private_key` from your service account JSON credentials.
private_key: process.env.SERVICE_ACCOUNT_PRIVATE_KEY,
},
scopes: ["https://www.googleapis.com/auth/drive"],
});This setup grants your application a broad access scope to Google Drive, allowing it to perform operations without interactive user consent.
Call Google Drive API
With authentication set up, your application can now interact with the Google Drive API to perform various tasks. Let’s upload an image to Google Drive and download.
const { google } = require("googleapis");
const fs = require('fs');
const path = require('path');
const api = google.drive({
version: "v3",
auth: authClient,
});
function createFolder(folderName) {
const fileMetadata = {
'name': folderName,
'mimeType': 'application/vnd.google-apps.folder'
};
const { data } = await api.files.create({
resource: {
name: folderName,
mimeType: 'application/vnd.google-apps.folder'
},
fields: 'id'
});
return data?.id;
}
function uploadImage(fileName, filePath, folderId) {
const { data } = await api.files.create({
resource: {
name: fileName,
parents: [folderId]
},
media: {
mimeType: 'image/jpeg',
body: fs.createReadStream(filePath)
},
fields: 'id'
});
return data?.id;
}
function downloadImage(fileId, destPath) {
const dest = fs.createWriteStream(destPath);
const res = await api.files.get({
fileId: fileId,
alt: 'media'
},
{responseType: 'stream'}
);
return new Promise((resolve, reject) => {
res.data
.on('end', () => {
resolve();
})
.on('error', err => {
reject(err);
})
.pipe(dest);
});
}
function deleteFile(fileId) {
return api.files.delete({
fileId: fileId,
});
}
function listImages(folderId) {
const { data } = await api.files.list({
q: `'${folderId}' in parents and mimeType contains 'image/'`,
fields: 'files(id, name)',
spaces: 'drive',
});
return data?.files || [];
}
(async () => {
const folderId = await createFolder("images");
// => 1wFSV_WvcbGmqk01x52GAanKjKE8Tbb6M
let images = await listImages(folderId);
// => []
const imageId = await uploadImage("img.jpg", "/path/to/img.jpg", folderId);
// => 1VsKdp_yNoTe_4L4WfVwcfoerIQ0hv85T
images = await listImages(folderId);
// => [ { id: '1VsKdp_yNoTe_4L4WfVwcfoerIQ0hv85T', name: 'img.jpg' } ]
await downloadImage(imageId, path.join(__dirname, "img-downloaded.jpg"));
await deleteFile(imageId);
images = await listImages(folderId);
// => []
})();While this instance focuses on images, the approach is adaptable and can be employed to upload various types of files to meet different needs. Whether you are looking to store documents, spreadsheets, presentations, or any other file type, the method remains consistent - only requiring minor adjustments to the mimeType and file source. This flexibility makes it an invaluable tool for developers seeking to automate file management in Google Drive, streamlining workflows and enhancing productivity across a wide range of applications.