My smart home hub setup
Introduction
As an experienced smart home enthusiast, I have learned that a reliable smart home experience hinges on a solid hardware foundation. While the hub setup might not seem as thrilling as the latest gadgets, it is crucial to get it right. In this article, I will share the practical side of my passion: the hardware setup that powers it all. I will guide you through the essential hardware choices that form the core of my smart home and share insights on avoiding common pitfalls that could compromise your smart home’s performance.
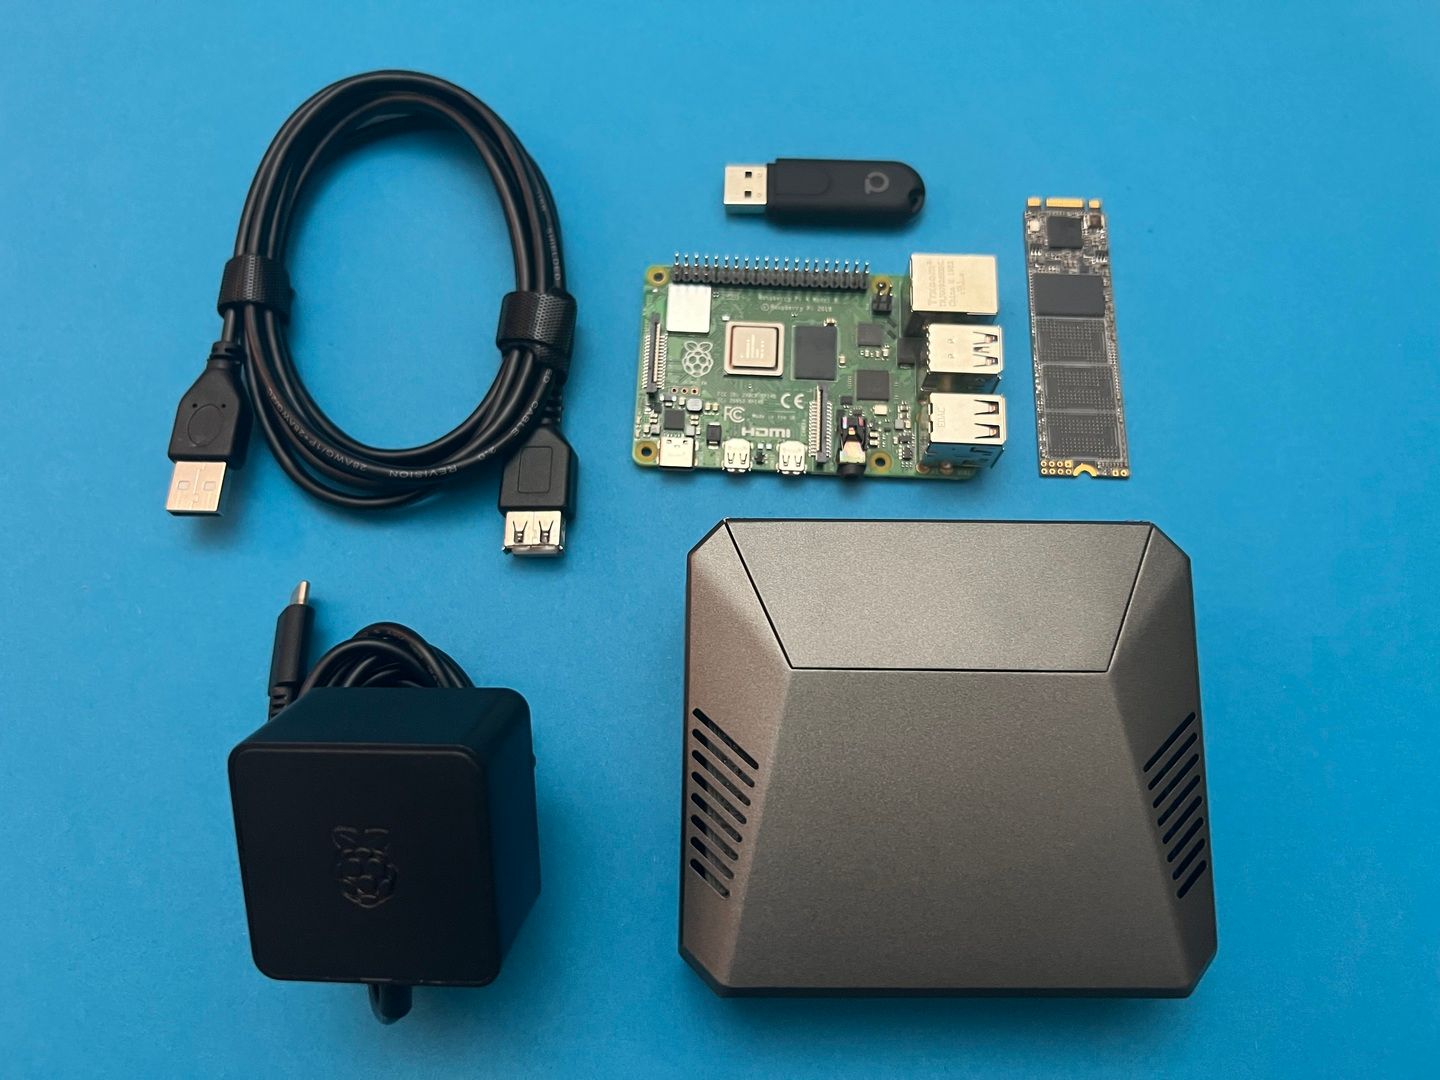
Table of contents
Platform
I have anchored my smart home in the robust and versatile platform of Home Assistant . This open-source home automation platform is the cornerstone of my setup, interfacing with a variety of devices and automation services that proprietary systems often cannot match.
Home Assistant runs locally and prioritizes local control keeping my personal data within the boundaries of my home network and ensuring that my smart devices function independently of an internet connection. This approach not only enhances privacy but also reliability, as communication between the smart home, its users, and connected devices is not affected by network delays and availability.
Moreover, the platform’s extensive compatibility with a wide range of devices and protocols means that I am not tethered to a single brand or ecosystem. This flexibility allows me to handpick the best hardware on the market, from sensors to smart lights, without worrying about interoperability issues.
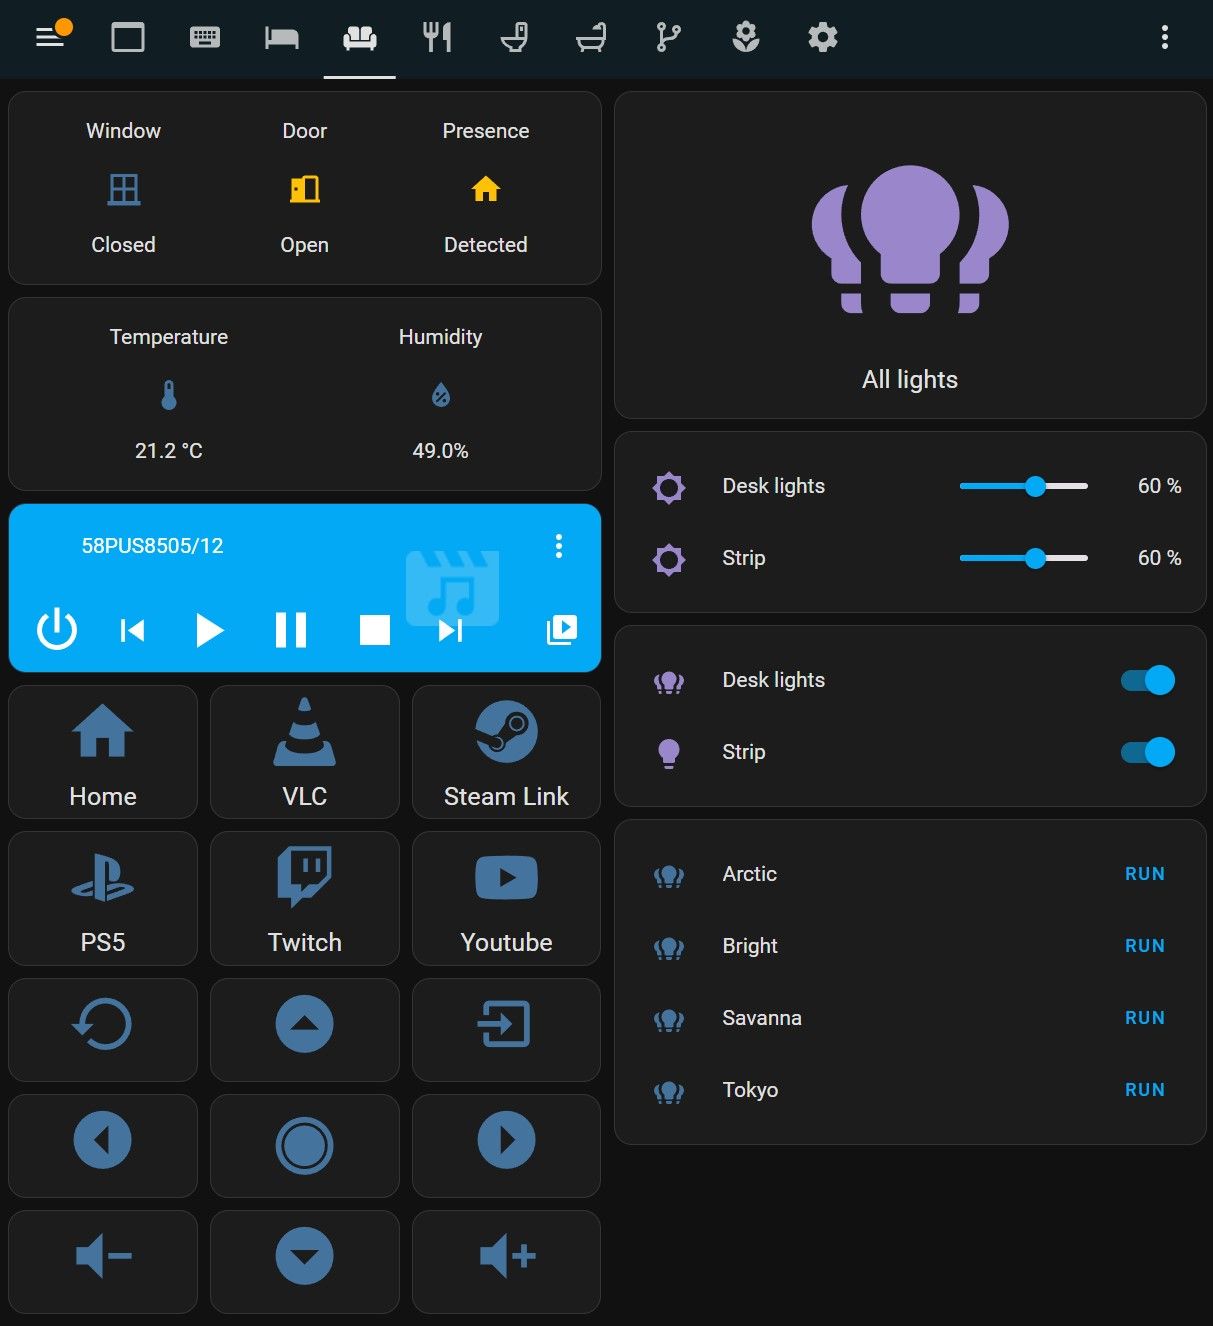
Home Assistant offers a wealth of features too extensive to cover in one sitting. For the purpose of this article, I will simply highlight that it is the driving force behind my smart home setup. Stay tuned for future articles where I will dive deeper into Home Assistant’s capabilities.
Hardware
Now, let’s focus on the critical hardware components that power my smart home system.
Raspberry Pi
When it came to setting up my smart home, Raspberry Pi 4 Model B was my go-to choice. With its 4GB of RAM, it has been reliably powering my Home Assistant and its associated services (VSCode Server, Node-RED, Grocy and others). I have found this amount of memory to be just right — enough to handle everything I throw at it without a glitch.
Another key reason for my selection was the built-in Ethernet port. It has been a game-changer for network stability. Unlike Wi-Fi, which can be hit-or-miss depending on various factors, a wired connection through the Ethernet port has given me a consistent and reliable link to my home network. This reliability is something I particularly value for my smart home, as it ensures that my automations and controls remain active and responsive at all times.
Moreover, the existence of the USB 3.0 port on the RPi has been particularly useful. It has allowed me to connect additional peripherals to add Zigbee support.
In my experience, the Raspberry Pi 4 Model B hits the sweet spot for running a smart home hub. It is a compact, energy-efficient machine that is yet powerful enough to keep my smart home system running smoothly, day in and day out.
Case
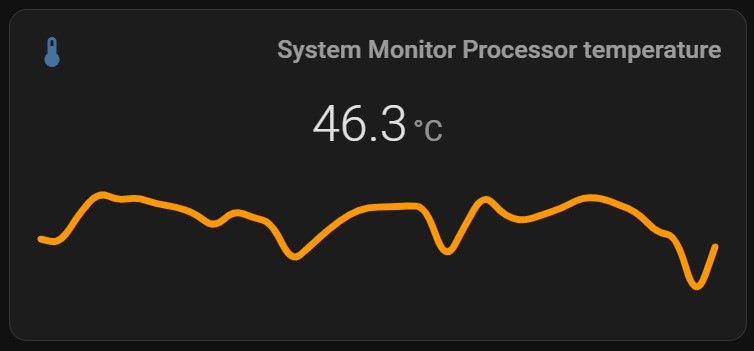
I have opted for the Argon One M.2 case , and for good reason. The case features an effective built-in fan which is a significant advantage for cooling. This is especially important when the RPi is under load, running 24/7 as the heart of my Home Assistant hub.
Beyond cooling, the case’s metal build is not just for durability or aesthetics; it directly contacts the RPi’s chips for enhanced heat conduction. Such design helps maintaining optimal operating temperatures. Since installing the case, I have noticed that temperatures rarely, if ever, exceed 50°C, even with the continuous demand placed on the RPi by Home Assistant and other services running within Home Assistant.
Perhaps the most practical feature of the Argon One M.2 case is the inclusion of an M.2 slot for SSD storage. This allows me to expand the RPi’s storage capabilities, leading to faster read/write speeds that benefit the overall performance of Home Assistant, especially when it comes to logging and accessing data.
Storage
An often underestimated aspect of setting up a Home Assistant hub is the choice of storage. The right selection is critical, as it directly impacts the speed, reliability, and longevity of the system.
SD cards
SD cards are the most common storage medium for RPi and other Home Assistant compatible microcontrollers due to their ease of use and affordability. However, they are not without downsides. SD cards have limited write cycles and are more susceptible to data corruption, especially in scenarios with frequent write operations, which is often the case with Home Assistant’s logging and device data persistence activities.
External SSDs
External SSDs provide an upgrade in durability and speed over SD cards, making them a worthwhile option for expanding smart home storage. However, their larger size and dependency on a USB connection bring about several considerations. Beyond requiring more physical space, which can challenge a clean setup, the presence of a USB cable introduces a risk of accidental disconnections. This can be particularly problematic in environments where the smart home hub is frequently accessed or moved.
Moreover, the visual impact of external SSDs and their cables may detract from a minimalist setup, making the system appear more cluttered.
eMMC modules
eMMC modules offer a middle ground, with better reliability than SD cards and potentially faster performance. However, they still fall short of the speed provided by a direct M.2 connection and are often more expensive than both SD cards and some SSDs, making them less common for storing smart home data.
M.2 SATA SSDs
Unlike external SSDs, which can be bulky and require a USB cable for connection, M.2 drives offer a sleeker, more integrated solution. They connect directly to the motherboard, eliminating the need for external cables and reducing the risk of disconnection - a significant advantage in any setup that values reliability and aesthetics.
For my system, leveraging the M.2 SSD with the Argon One M.2 case was the optimal decision. Even though my M.2 SSD is technically connected via USB within the case, it is a far more streamlined approach than using a traditional external SSD. This setup avoids the clutter and potential disarray brought on by external drives and their cables. Moreover, it ensures that Home Assistant operates efficiently, with less risk of slowdowns or data loss, which are common concerns with the other storage forms. 128GB capacity is more than sufficient, as even a 64GB drive is typically enough for Home Assistant’s data over a prolonged period.
Zigbee gateway
My smart home setup relies on the Conbee II stick as the Zigbee gateway to connect a wide range of compatible devices from different manufacturers. This gateway is crucial for maintaining communication between sensors, lights, and other smart gadgets, all managed via the ZHA integration . In comparison to other gateways, Conbee II supports more than 100 devices. In my case, 30+ devices have worked without issues.
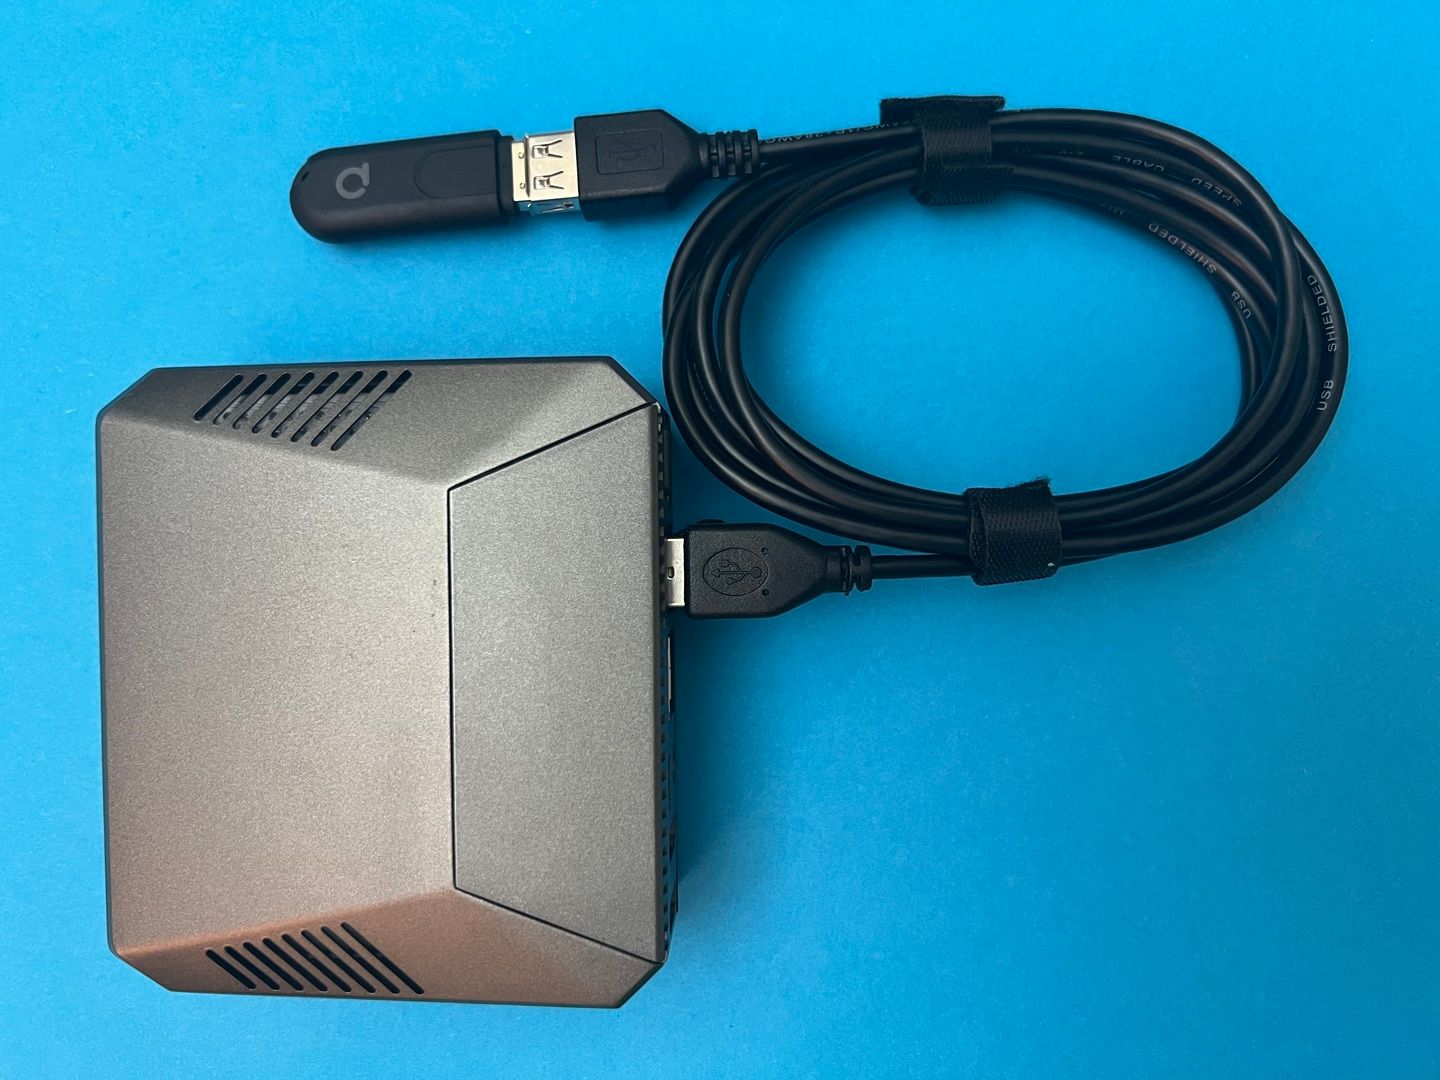
To enhance the ConBee II’s performance and reduce the chance of signal interference from the RPi, I use a USB extension cable. This simple yet effective solution not only helps in avoiding electronic noise from the RPi but also aids in placing the ConBee II in a location that is best suited to cover my whole apartment as well as avoid interfering with 2.4GHz Wi-Fi network.
Conclusion
It has been three years with my current smart home setup, and I can say with satisfaction that it has served me well. Using Home Assistant hosted on a Raspberry Pi 4, the system has been steadfast — no major issues, just a reliable part of my daily life. It is the kind of tech I can count on, and that is exactly what I have always wanted from my smart home hub.